
Swamp Music
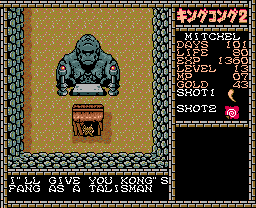 |
One thing you'll notice about the Marsh is that your movement is slowed to a crawl. That is unless you equip the Sandals. Do so from the menu and you'll move just as fast in the Marsh as on dry land. One other thing you should know is that Marsh enemies tend to only be vulnerable to Kong's Claw, so make sure you have that equipped. When you enter the Marsh, head east and follow the path until you reach the Mireworm. You can defeat it for a tip if you want, but it's not necessary. You'll want to head to the screen to the right of the Mireworm to reach some huts. The top hut offers you rest, but it will cost you your Sandals, so don't do it. Head one screen south and pick up the Kong's Fang from the hut beneath the statue. |
| Now we need to return to the Grasslands from way back in the beginning of the game. There are a couple of things we need to get while we're here. In the northwest portion, in the screen with the Grassworm, you can use the Temusa Spell to shatter the tombstone and find the Sword, a weapon that is useless above ground, but is very powerful in the cellars. Afterward, head to the southwest corner, shatter the Tombstone there, and in the cellar, you'll find Whitefires and a locked gate. The Whitefires can only be defeated with the Sword, so keep that in mind if you want to battle them. You can unlock the gate with Kong's Fang, and you'll find the Amulet there, which will be needed soon enough. | 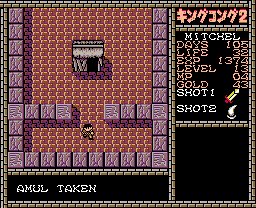 |
 |
Now start heading back toward the Marsh. On the way, you'll come across a tombstone in a screen full of Bowlers. Use the Temusa Spell to enter the cellar beneath it. You'll encounter more Whitefires (remember, they can only be defeated by using the Sword). Defeat 6 of them and they will drop the Lamera, which will be necessary very soon. You can head into the room below, which houses an extra Papyrus (or two if you never got the one from the Red Spider), and the Nemuri Spell (which temporarily freezes on-screen enemies for 5 MP), but the screen will be pitch-black. You can come back here later when you have the ability to see in the dark, or creep around in the dark and get them now (a map would be useful). In either case, once you leave, go back to the Marsh. |
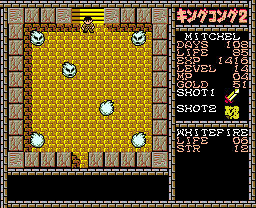
| Back in the Marsh, just head north until you encounter the Mudarmor. As long as you have the Lamera and some Stones, this boss is a piece of cake. Just stand there and throw Stones rapidly until he dies. But you can't defeat him without the Lamera, and he's only vulnerable to Stones, so be aware of that. Defeat Mudarmor and a new path opens to the west. | 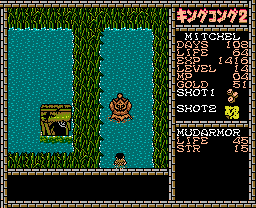 |
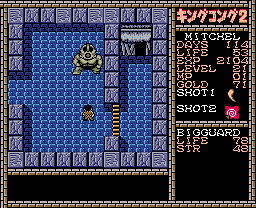 |
A few screens west of the Mudarmor is another Tombstone, so use Temura on it to reveal another cellar to explore. In this cellar is are Watchmen, an enemy that just slowly walks around, but they are amazingly powerful. They also give very good experience points. If you use Stones or Boomerangs to attack them, they're a bit more manageable, in case you want to level up a bit. Head to the far left screen filled with Watchmen and defeat the 6 of them there to reveal a staircase leading down. Down below is a BigGuard. Whirling away is again the method of choice here. Just make sure your HP is high enough to take a couple hits, equip Kong's Claw and use the Whirl Spell. He'll drop a key that can be used to unlock the gate. In the hut behind the gate, you will receive the Makapora Spell. |
| The Makapora Spell is necessary to defeat a few bosses at 10 MP a pop, but it's not really any use other than that. But you do need it to defeat the next boss. To get to the Nasty, the next boss, head back to the western part of the Marsh where the Mireworm resides. Just to the left of the Mireworm is The Nasty. Just cast the Makapora Spell once and it'll die. You cannot defeat it any other way. Once it dies, it will drop the Harpoon (a weapon that's only effective against F. Men, so don't bother with it for now) and open up a path to the foreboding Ruins. | 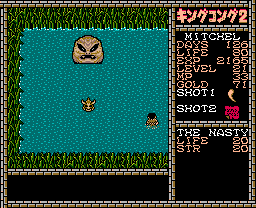 |