
Chapter 2: Into the Depths of Sol Sanctum
Contents: Walkthrough Index  |
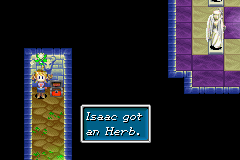
In this video game series there is many puzzles and
this
is one of them I like to call Stepping Stones. Basically you need to
find the pattern which you can jump from stone to stone and aventually
reach the other side. You should start where Isaac is in the picture or start by the right most "stepping stone" and jump up 3 stones. Then Jump left twice, down twice, left once and finally up three times. In the next rooms you can encounter monsters, to handle them I reccomend just attacking if there is less then two but, if there is three have Jenna use Blaze once and then attack with the rest. The next room is a long narrow hallway but, it heads directly to the next room after it so, it shouldn't be much trouble to navigate it. |
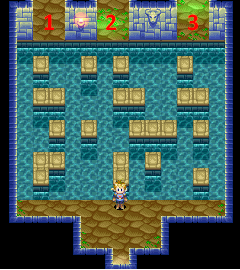 |
In the next room after the long hallway we have yet
another stepping
stone puzzle. This stepping stone puzzle is slightly different from the
last one due to the stepping stones themselves lead to 3 seperate
sections. I labeled these sections in the picture from left to right as
1, 2 and 3. To
get past this room you need to visit the sections in the order of 2, 3
then 1 however; I'll still write how to get past this section below. Again you should start from where Isaacs is in the picture, or from the stone straight north of the door you entered from. Then jump up once, right once and up again. You are now at a split where you can jump to two stones so, take a step to the left and then jump up to the next two stones. A third jump up will land you on the other side of the room at section 2.
Jump down three times, right once and up three times. You kind of make a "U" shape to jump over to section 3. From Section 3 head north until you see a minotaur statue with a glowing eye sticking out of the wall. You'll have to walk up close to it and push [A]. Afterwards highlight Items and push [A] again. Then choose the character who has the small jewel (by using the movement pad and the [A] button). Finally highlight the Small jewel in thier inventory and choose to use it (again using movement pad and the [A] button). Then the room will shake alittle indicating something has happened, head back south to where the stepping stones are and you'll have to jump to back to the south proportion of the room room. Do this by jumping down once, take a step to the right and jump down again. Then jump to your left and stand on the middle square and jump down. Finally jump left and down and you'll be back where Isaac is on the picture. Luckly jumping up to section 1 is pretty simple. Just stand infront of the stepping stone on the left side of the room and jump up five times and you'll reach the section 1 area. Then you just head straight into the next room. |
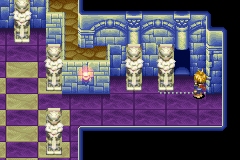 |
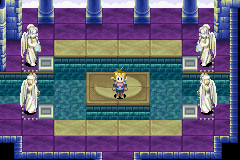
In the next room your party engages in a small
conversation that isn't important. This room has a lot of statues
inside of it however; to the far left and right side of the room is a
statue with a doted border around it. The doted
border is an indication that it can be pushed around within the border
so,
you should go to the statue on the
far right side, push it and walk into the door behind it. To push a
object just stand next to it and hold the movement pad in a direction
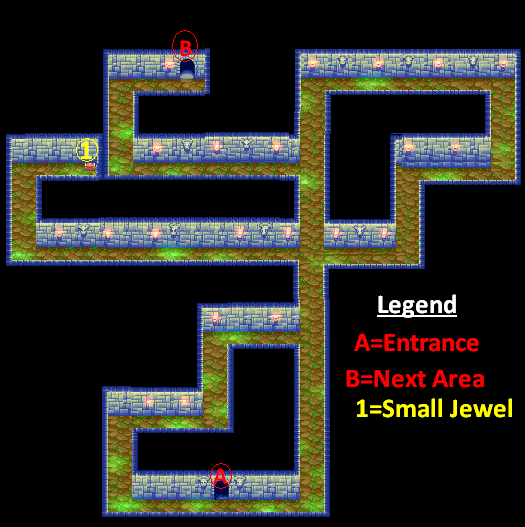
it can be pushed in. This door leads to a small room with a staircase, and that staircase leads to the maze room entrance (A), which is in the picture below. The monsters in this room are harder and some groups of monsters in this room come in four so, I reccommend that you start using Jenna's Blaze in every battle. |
|
|
 |
Again we are in another maze like room but its alot
simplier then the one from before. Inside this new room you'll want to
head right and take the
first hallway north. This will be a short hallway so, when it ends head
left then north around a small corner.
Afterwards we should enter the next room to the east and you will get another short cutscene with more pointless questions you have to answer. However, when the cutscene is over you should probably take all the gear off of Jenna and give it to either Garet or Isaac to sell later, because she will be leaving the party soon. |
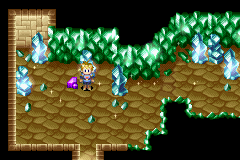 |
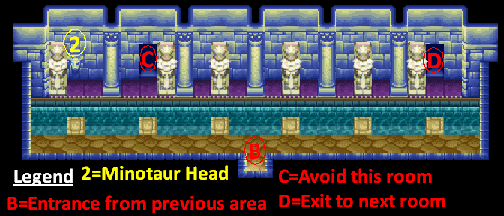
When thats done you should head south inside the Moon
room
and there will be a hallway that leads to a staircase.
Go up this staircase and take the next hallway south. This will lead to
another doorway and inside this room you will find a purple rock
otherwise knowned as a
Psyenergy Stone. It recharges everyones PP when you try to pick it up
so, whenever you find these you should probably use Isaacs Cure
psyenergy
to get the most you can out of it. On another note, Psyenergy Stones
reappear after you
completely exited an area. Just as a comment, Isn't this room super extra Shiney! Why arn't the characters freaked out by this room. It must just be another day walking through Sol Sanctum... |
 |
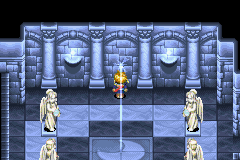
After your finished with the Psyenergy stone exit the same door you entered from. Then head north in the hallway into the next room. The first part of this room, again has a moon symbol in the center on the ground and has statues that can be pushed onto platforms. Although if you do this now it activates a trap followed by a long cutscene with Kraden yelling at you that Its a trap!! However, this cutscene can be avoided. |
 |
To progress from this point you need to
head to the next room over on the left. It has a symbol of the Sun on
the ground and 3 statues. What you need to do in this room
is push the two smaller statues onto their gray platforms. When this is
done
they will
reflect light causing a hole in the ground to appear. After that jump
onto the
center platform from the south porportion of the room and get as close
as you can to the larger statue. Then use the psyenergy "Move" on the
statue. You'll need to pull it towards you and it will drop into the
hole. When thats done, you have offically deactivated the trap and you can proceed with pushing the four statues onto thier gray platforms on the right side of the room. Kraden will run upstairs anyway and tell you whats going on but, your at least avoiding the one cutscene. |
 |
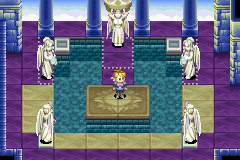
Afterwards go downstairs, and Kraden's mental condition
isn't becoming anymore stable. Head west into the next room and you'll
see a
beam of light being projected on the northern wall. Go up to where the
light is being projected to and press [A]. It will
open a portal, so everyone jumps in and you are transported to some
kind of elemental shiney place and Kraden goes crazy talking about how
ridculously shiny the place
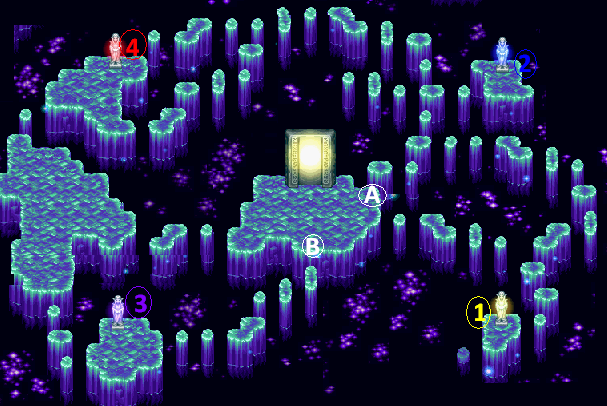
is. After you enter you get another long cutscene and your asked to awnser 4 questions. Although the forth question you have to awnser with yes, otherwise Jenna will keep asking you to help Kraden. When you do awnser yes, Kraden gives you four MYTHRIL BAGS and instructs you to collect the stars. In conclusion, Kraden and Jenna stand back while Isaac and Garet go the elemental stars located in this room. |
|
|
Contents: Walkthrough Index