
Ocean Front Property
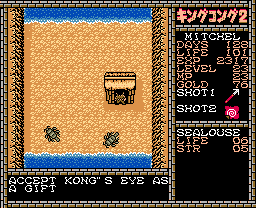 |
Just north of The Nasty is the Ruins, a scary place filled with scary enemies. But there's not much we can do here for now. Just head north a couple screens (don't go up the stairs!), then head east until you leave the Ruins and encounter some Crows. You can kill the Crows for a tip, but that's not needed with me here, so head south to make it to the Ocean. Here's where you'll want to equip the Harpoon. There are tons of F. Men here, and they're only vulnerable to the Harpoon. Best of all, the Whirl Spell uses 0 MP when used with the Harpoon so whirl away any and all F. Men that get in your way. Head south until you come to this hut. If you accepted the letter earlier in the game, you'll receive Kong's Eye here. Otherwise, you'll have to return to the Mountains, get the Letter, and return here. The Kong's Eye allows you to see in areas that would otherwise be pitch black. |
| After picking up the Kong's Eye, we're not quite done with the Ocean area. Just west of where you got Kong's Eye is a Tombstone (you'll need to go south, then west then north). Beneath the Tombstone is a cellar with Lakuna's Orb. And in the far southern end of the Ocean area is a tent where you can find a broken Radio. Make sure you get both before returning to the Ruins. | 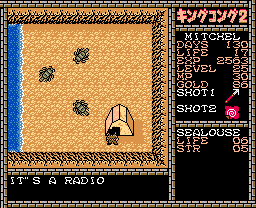 |
 |
Go back to the Ruins area, and in the screen just west of the Crows, head south and follow the path to the Temple. Now that you have Lakuna's Orb, two items will appear here, the Kong's Roar and Power Orb. You'll need them both, so pick them up. At this point, you should probably head back to the Marsh. |
| Return to the Marsh area at this point. If you never got the Nemuri Spell earlier in the game (because you were waiting for Kong's Eye), now would be the time. It's in the Mountain Cellar, just before the Marsh entrance (where you got the Lamera). After picking that up (and the spare Papyrus if you want it), go back to Marsh and take the western path, past the cellar staircase, and you'll encounter Twinmires. Just Whirl him with Kong's Claw, and move on, and you'll find another Twinmires. Do the same to him and the red stone blocking the western path will be destroyed, allowing you to explore that direction.. |  |
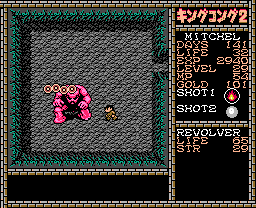 |
The area west of Twinmires is pitch-black, so you need Kong's Eye to see. There are Cavemen in the first screen. If you defeat 10 of them, you'll get the F. Ball, which is a projectile weapon that's very powerful, since it hits multiple times. Be sure to pick it up (and possibly some extras if you'd like). To the left of the Cavemen is Revolver. You can either use the regular Whirl/Kong's Claw tactic (although you won't be able to see anything, since it'll be dark without Kong's Eye) or you can use your new F. Ball weapon on him. Either way, after he's gone, he'll drop the Agnos Key. |
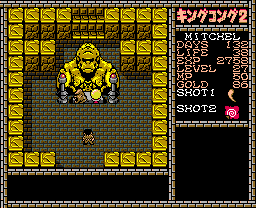
| Now's as good of a time as any to get that Radio fixed, but you'll need a whopping 350G to do it. Since you probably don't have those kind of funds handy, you need to gather some gold. The best place is still probably the pond near the start of the game. After you have 350G, return to the Ruins, and in the screen just west of the Crows, you'll see a path leading north. This place is populated by tough Jumpmen and Clingmen. Follow the path until you reach a fork in the road, then head east. Equip the Radio and enter this hut by the Helipad. When the option to fix an item appears, be sure the Radio is equipped and press '2'. If you try to fix anything else, he'll take your money, and you'll get nothing out of it, so be careful! | 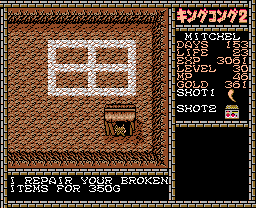 |
 |
With the Radio fixed, we're ready to head to the Temple, but the difficult part is finding it. Return to the Ruins, and when you get there, head to the left three screens until you reach the area with the tiled floor, then go south. If you use the Power Orb in the location pictured here, a new path will open and the Temple will be yours to explore... |