
The Knight

Lord Ironfist


Each castle has a different crest depending upon the colour of the player. In this case
the red crest is that of Lord Ironfist as his campaign is waged as the red colour.


See the town in action. A calm stroll to Ye Olde Faire ground.
Knight Town Creatures
Here is a rundown of the Knight/Farm town and its base
creature
statistics. Learn them well.
| Knight Creatures |
Name | Hit Points | Speed | Attack | Defense | Damage | Shots | Cost | Special | Pop | Home |
|---|---|---|---|---|---|---|---|---|---|---|---|
    |
Peasant | 1 | Slow | 1 | 1 | 1 | N/A | 20 |
N/A |
12 |
  Thatched Hut Thatched Hut |
    |
Archer | 10 | Slow | 5 | 3 | 2-3 | 12 |
150 |
N/A | 8 |
  Archery
Range Archery
Range |
    |
Pikeman | 15 |
Medium | 5 | 9 | 3-4 | N/A | 200 |
N/A | 5 |
  Blacksmith Blacksmith |
    |
Swordsman | 25 | Medium | 7 | 9 | 4-6 | N/A | 250 |
N/A | 4 |
  Armory Armory |
 |
 Cavalry   |
30 | Fast | 10 | 9 | 5-10 | N/A | 300 |
N/A | 3 |
  Jousting
Range Jousting
Range |
    |
Paladin | 50 | Fast |
11 |
12 |
10-20 |
N/A | 600 |
Attacks 2x |
2 |
  Cathedral Cathedral |
There is an unspoken "Knight Rule" in Heroes of Might and Magic. This
rule dictates (if you look at the statistics) that the most expensive
Knight units are also by far the most cost effective. You will want to
purchase the Paladins before the Cavalries (at 600G they can defeat a
stack of 2 cavalries and still be able to go on killing), but purchase
Cavalries before Swordsman as they are only 50G more and are nearly
twice as effective. Swordsman should be purchased before Pikemen as
they are again, 50G more than Pikemen but far more flexible and strong.
Archers
should always be bought before Peasants (but are the exception to the
rule, as Archers may be more useful than Pikemen). Peasants may only be
20g, but
they're only remnants from the old game
King's
Bounty.
However, while the Knight town is the weakest in the game, in
multiplayer it tends to be the best for first strikes against
opponents. You can get masses of its troops easier than any other town
and it is entirely possible to get Paladins in the middle of the second
week to wreak havoc on your enemies early on. Knight creatures do not
require many special resources to use (if you get your lumbermill on
day one and find a nearby crystal mine in a few days, you should be
fine). Never use Knights for the long run, if you start out as them,
take over a stronger town and use them for your endgame while only
buying the strongest units for your remaining Knights. However, the
Knight town is the most self sufficient, being able to purchase every
creature and have some to spare at week's end.
Nearly every unit in the town is best in class when it comes to skills
(except the peasant). Skill levels are the one thing Knights tend to
excellerate in.
That being said, Lord Ironfist the Knight is the victor in the
campaign story. The Campaign also features many conquerable neutral
knight towns to provide income and supplement the knight's weak hordes.
Now for the individual unit commentary:
 Peasants
are the weakest
creatures in
the game and worst at
price/performance bar none. Once you have your other 5 creature levels,
ditch
these last minute resorts as they are only useful for wasting space and
making your hero move slowly. That being said, if there is a map where
lots of them are being given away freely, you may wish to have your
garrison hero pick some up weekly, perhaps. They are also the most
plentiful per week. They've evolved from the fat squat people of King's
Bounty, but oddly enough they have the exact same stats but cost twice
the gold. Thatched Huts often are found on the map also, which allows
you to supplement your numbers, something very important if you're
using Paesants because they are so weak your only hope to get any use
of them is to attempt to have enough to be slightly useful.
Peasants
are the weakest
creatures in
the game and worst at
price/performance bar none. Once you have your other 5 creature levels,
ditch
these last minute resorts as they are only useful for wasting space and
making your hero move slowly. That being said, if there is a map where
lots of them are being given away freely, you may wish to have your
garrison hero pick some up weekly, perhaps. They are also the most
plentiful per week. They've evolved from the fat squat people of King's
Bounty, but oddly enough they have the exact same stats but cost twice
the gold. Thatched Huts often are found on the map also, which allows
you to supplement your numbers, something very important if you're
using Paesants because they are so weak your only hope to get any use
of them is to attempt to have enough to be slightly useful.


 Archers
are the only shooting unit
in the
Knight army, that meaning that even though they are slow, they are the
backbone of any siege warfare that needs to be done.They are cheap at
150G each and plentiful as well with 8 pop. Because of these useful
(but ever so slow) units, the Knight tends to slow to a crawl even in
the middle and late game when they have all their units. Like them or
Loathe them, they are all you as a Knight have for range. Archers are
also acquired on the map from cottages, supplementing the knight's army
somewhat. They are very
similar to the archers from the predecessor game, King's Bounty.
Archers
are the only shooting unit
in the
Knight army, that meaning that even though they are slow, they are the
backbone of any siege warfare that needs to be done.They are cheap at
150G each and plentiful as well with 8 pop. Because of these useful
(but ever so slow) units, the Knight tends to slow to a crawl even in
the middle and late game when they have all their units. Like them or
Loathe them, they are all you as a Knight have for range. Archers are
also acquired on the map from cottages, supplementing the knight's army
somewhat. They are very
similar to the archers from the predecessor game, King's Bounty.


 Pikemen
are the third level
unit for the
Knight. They are 200G per creature and they can take a hit with their 9
defense, but their paltry 15 HP makes them a little less useful. They
are however more powerful than a few level 2 creatures that cost the
same amount. Nonetheless, despite being tied for cheapest level 3 their
equal costing Wolf brothers are more cost worthy, being fast, able to
attack twice and having 5 more HP. Pikemen are the begining of the
"Knight Rule" mentioned previously. They are still powerful in numbers,
which is all they can do. They compliment the Paladin well but be sure
to buy all higher level creatures first. Pikemen are a strong defender
and just like King's Bounty, are also the start of a fairly powerful
Knight strike force.
Pikemen
are the third level
unit for the
Knight. They are 200G per creature and they can take a hit with their 9
defense, but their paltry 15 HP makes them a little less useful. They
are however more powerful than a few level 2 creatures that cost the
same amount. Nonetheless, despite being tied for cheapest level 3 their
equal costing Wolf brothers are more cost worthy, being fast, able to
attack twice and having 5 more HP. Pikemen are the begining of the
"Knight Rule" mentioned previously. They are still powerful in numbers,
which is all they can do. They compliment the Paladin well but be sure
to buy all higher level creatures first. Pikemen are a strong defender
and just like King's Bounty, are also the start of a fairly powerful
Knight strike force.

 Swordsmen
are an excellent example
of
the "Knight Rule". They are a mere 50G more than the Pikeman and yet
superior in every area except the already superb defense. That being
said, they are however the worst level 4 creature. Minotaurs are
overall much stronger, Ogres outclass them in brute force and Druids
can kill a fair deal from afar. However, they are the most plentiful
level 4 and most cost effective. Far better in comparison to the
Pikeman. They are the middle power of the Knight army and again, should
be strong in the early game with their weight in numbers. Swordsmen
seem to have evolved from 2 different creatures in King's Bounty,
Militia (weak) and Knights (Strong).
Swordsmen
are an excellent example
of
the "Knight Rule". They are a mere 50G more than the Pikeman and yet
superior in every area except the already superb defense. That being
said, they are however the worst level 4 creature. Minotaurs are
overall much stronger, Ogres outclass them in brute force and Druids
can kill a fair deal from afar. However, they are the most plentiful
level 4 and most cost effective. Far better in comparison to the
Pikeman. They are the middle power of the Knight army and again, should
be strong in the early game with their weight in numbers. Swordsmen
seem to have evolved from 2 different creatures in King's Bounty,
Militia (weak) and Knights (Strong).


 Cavalry
is the second most
powerful unit
the Knight army has at their disposal.They are also a mere 50G more
than a Swordsman, of whom they can defeat two. They are the only Large
type unit available for the knight. If directly in front of another
large unit with a clear path, they can strike from across the
battlefield on the first turn. Stock up on these as soon as you get
them. Despite being the weakest level 5 creature, they are more
powerful than most level 4 creatures. Use them in numbers while you
can. Cavalry also was a unit featured in King's Bounty, one of the
strongest you could purchase from your starting castle.
Cavalry
is the second most
powerful unit
the Knight army has at their disposal.They are also a mere 50G more
than a Swordsman, of whom they can defeat two. They are the only Large
type unit available for the knight. If directly in front of another
large unit with a clear path, they can strike from across the
battlefield on the first turn. Stock up on these as soon as you get
them. Despite being the weakest level 5 creature, they are more
powerful than most level 4 creatures. Use them in numbers while you
can. Cavalry also was a unit featured in King's Bounty, one of the
strongest you could purchase from your starting castle.

 The Paladin is the cream of
the crop as
far as Knight units go. These master warriors are the strongest humans
in the world of Enroth. Like the Barbarian Wolves, these masters of
combat move fast and attack twice.However, HP-wise and in many ways, he
is the weakest of level 6 creatures. He may outdamage the Cyclops, but
that depends on two conditions. If the Cyclops hits 2 in a row, it
deals more, if the Paladin dies before it can deal its second blow, the
Paladin will deal less on that occasion as well. At 600G They cost as
much as 2 Cavalries, but they are over twice as strong. To top that off
the Paladin enjoys being roughly equal price to most Level 5 creatures.
You can get them early on fairly easily too, use them to your advantage
while they still are one. Paladins may also have been represented by
the Knights of King's Bounty.
The Paladin is the cream of
the crop as
far as Knight units go. These master warriors are the strongest humans
in the world of Enroth. Like the Barbarian Wolves, these masters of
combat move fast and attack twice.However, HP-wise and in many ways, he
is the weakest of level 6 creatures. He may outdamage the Cyclops, but
that depends on two conditions. If the Cyclops hits 2 in a row, it
deals more, if the Paladin dies before it can deal its second blow, the
Paladin will deal less on that occasion as well. At 600G They cost as
much as 2 Cavalries, but they are over twice as strong. To top that off
the Paladin enjoys being roughly equal price to most Level 5 creatures.
You can get them early on fairly easily too, use them to your advantage
while they still are one. Paladins may also have been represented by
the Knights of King's Bounty.
Knight Heroes
Knights are "Might" type heroes.
They have an
emphasis on attack and, slightly moreso, defense.
Knights possess a special
ability to lead, as
such they provide +1 morale to their troops. This enables them to
sometimes move twice per combat round.
Described here are the Knights, in near-alphabetical order. You can
click on a character to see how they fare/progress as the Heroes series
does as well.
 Ambrose
 |
Ambrose
is a
very Generic Knight. Little is known about him as he only appears in this game and Heroes of Might and Magic 2 with a different armour and background art. He is based off earlier Might and Magic Character art. |
 Arturius Arturius |
Arturius
is
a very Generic Knight. Little is known about him as he only appears in this game. He is based off earlier Might and Magic Character art. He may simply have retired before the Succession War. |
 Dmitri
 |
Dmitri
is a
very Generic Knight. Little is known about him as he only appears in this game and Heroes of Might and Magic 2 with a minor variation of his portrait. He is based off earlier Might and Magic Character art. |
 Ector
 |
Ector
is
based off Portrait art featured in Might and Magic since part 3. He
sticks around for Part 2 but mysteriously is not in the later games.
His
portrait is nearly identical in Heroes of Might and Magic 2. |
 Lord Haart
 |
Lord
Haart
is an active participant in Heroes of Might and Magic but
steps
out for the Succession Wars. He eventually participates in the
Restoration Wars,
where he meets his end. Details on the Hero page. |
 Lord Kilburn  |
Lord
Kilburn
is a Knight you are tasked with finding in Might and Magic 1. He
subequently appears
in this game and Heroes of
Might and Magic 2. Kilburn and Gallant's portraits are flipped for the
Gameboy version. |
 Maximus
 |
Maximus
is
based off Portrait art featured in Might and Magic since part
3. He sticks around for Part 2 but mysteriously is not in the later
games. His portrait is fairly modified in Heroes of Might and Magic 2.
See the Heroes page for details. |
 Sir Gallant  |
Sir
Gallant
first appeared as a player character in the original Might and Magic.
He has since
appeared in Strategic Quest and Heroes of
Might and Magic 2t. He may be
based off his earlier Might and Magic Character art. (His name is one
letter off a Might and Magic 1 Player Character name) |
 Tyro  |
Tyro is a very Barbaric looking, but Generic Knight. He was a hero of Xeen alongside Arturius beforethis game. In Heroes of Might and Magic 2 he has slightly bushier hair. He is based off an earlier Might and Magic Character. | Lord Ironfist |
Lord
Morglin Ironfist isn't a hero per say, but he can be considered the
"Player"
when you use him in the campaign. He is also the Canonical winner and
his line continues to his sons Roland and Archibald along with Roland's
own son, Nikolai. He's not in the Gameboy Version. |
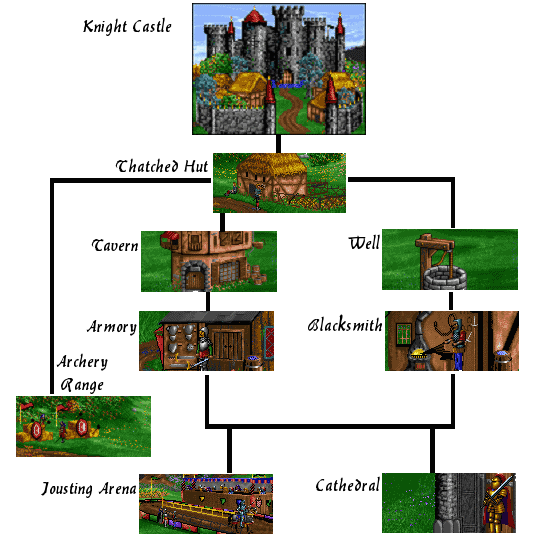
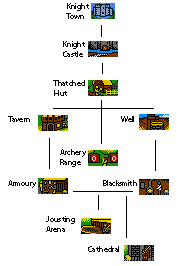
Knight Castle Building Statistics
The
knight has a few small
challenges sent their way early in the game, but these are very minor
and require few resources to overcome.


Castle
Every Town requires a castle to build anything else. This town is no
exception. Before it it built there is merely a tent in its stead.
Special:
Castles
allow your town to build additional buildings, hire heroes and also
provide 1000G/day.
Note: You NEED this.
Castles cost 5000 
 ,
20
,
20 
 and
20
and
20 


Well
The Well only requires a Castle and Thatched Hut to build.
Special:
Increases the creature population for each dwelling by 2 per week.
Note: You would be a fool NOT to buy it.
Wells
cost a
mere 500 .


Tavern
The Tavern requires only a Castle and Thatched Hut to be built.
Note: Not too useful except in defense, the Knight is meant for
striking early. Needed for Swordmen though so you have little choice in
the matter.
Special:
Increases the Morale of creatures defending the town by +2 (+20% chance
of moving again).
Taverns
are only
500 and 5 .


Thieves' Guild
The Thieves' Guild requires a Thatched Hut and Castle to be built.
Note: Not required for any other building. Special note! Not in the
Gameboy version (Image Fake)!
Special: Useful
for displaying information about the factions (increases as more are
added).
Thieves Guilds are pretty useful for the small cost of 750 and 5 .


Shipyard
The
Shipyard
requires a Thatched Hut and Castle to be built.
Note:
The
Shipyard allows you to construct Ships, allowing you to travel across
the sea to other lands.
Special:
Allows
creation of Ships for 1000
and
10 . (500 and 10
on Gameboy).
Shipyards
are
expensive suckers at 5000 and
20 .
Thatched Hut
The Thatched hut is not only a dwelling, but it allows everything else
to be buildable.
Note: You prettymuch HAVE to take this.
Special:
Provides 12 Peasants per week at 20 each.
Thatched Huts are cheap. Only 200 .
Archery Range
The Archery Range requires a Thatched Hut.
Note: Produces the only Archery unit of the Knight, but is skippable in the build tree.
Special: Provides 8 Archers per week at 150
each.Archery Ranges cost little at a mere 1000
.Blacksmith
The Blacksmith requires a Well.
Note: Required for the Jousting Range and Cathedral.
Special: Produces 5 Pikemen per week at 200
each.Blacksmiths cost 1000
and 5 .Armoury
The Armoury requires a Tavern.
Note: Required for Jousting Range and Cathedral.
Special: Produces 4 Swordsmen per week at 250
each.Armouries cost 2000
,
10
and
10
.Jousting Arena
Note: Makes the Knight's fastest unit. Not required for any other building.
Special: Produces 3 Cavalry per week for 300
each.The Jousting Arena costs 3000
and 20 .Cathedral
Note: Creates the Highest level creature for the Knight castle. Second fastest too.
Special: Produces 2 Paladins per week at 600
each.The Cathedral costs 5000
, 20 and 20 
 .
..
 The text in this document is licensed under the Creative Commons Attribution-NonCommercial-ShareAlike License. Anyone is free to use, copy, modify and re-distribute this work as long as they agree to the terms in the license.