
How to Play
Jump to: Tutorial Menu Usage TerminologyGetting Started:
This Tutotial only applies to the PC and Mac versions andunfortunately not the Gameboy version as the Tutorial was
not included on the Gameboy. You may still wish to read
along as a fair bit still applies. If you see a smaller, similar
looking icon, that means it applies to the GBC also with how
the mechanics work. Notes pertaining to the gameboy itself
specifically, will be in italic much like this text.
Hate to wade through rulebooks? Want to get familiar
with the basics of the game quickly and just go off and
explore? You’ve come to the right place. This tutorial
will walk you through a few turns of the Claw scenario.
Once you have installed Heroes of Might and Magic, load
the game and we’re off.
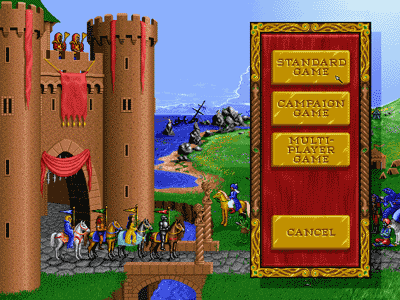
From the Main Menu, click on LOAD GAME.
Then click on STANDARD GAME from the next menu.
That menu will be replaced by the File Selector.
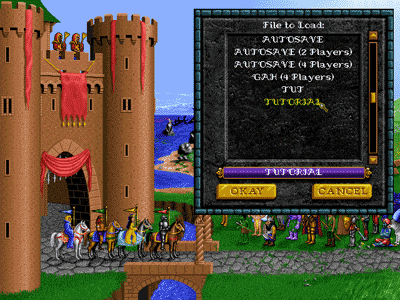
Click on the file name Tutorial, to highlight it. The name of the
file will also appear in the purple bar just above the two buttons
at the bottom of the File Selector. Click on OKAY.
(GBC only has the Adventure Map)
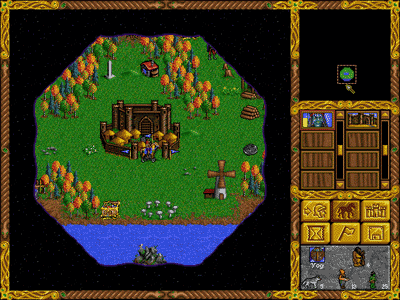
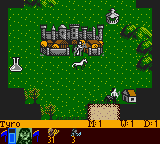
Lots of stuff to look at. The big window on the left is the
Adventure Map. That’s your castle in the middle with your
starting hero sitting astride a horse at its entrance. On the
right are a variety of controls and indicators. Let’s explore
these for a moment. In the upper right is the World Map.
(Not in the Gameboy Version)
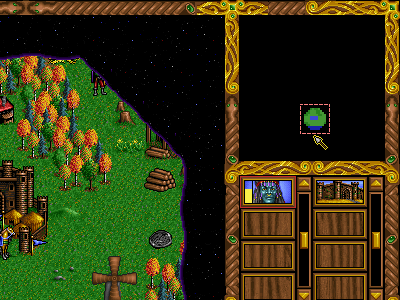
There’s a pink box around the area of the map that is dis-
played in the Adventure Map window. You start off only seeing
a short distance beyond your own castle. As you move your
heroes about, more of the map will become visible.
You can scroll the Adventure Map in a number of ways.
Move the cursor to the extreme edge of the screen and
the Adventure Map will scroll in that direction. Give it a
try. If you scroll too far and can no longer tell where
you are, look up in the World Map. Place the cursor
over the colored blob that is the territory your hero has
charted and click. The castle and the surrounding environs
are displayed again in the Adventure Map window.
Below the World Map is a display showing your heroes
and castles. This is the hero and castle selector. The
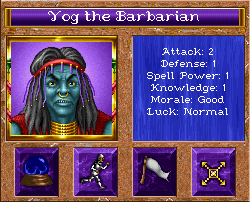
handsome blue fellow is the hero you happened to start
with. There is a red outline around his box, indicating he is
the “active” hero. (In the Gameboy version, the active hero is
displayed at the bottom of the screen.)
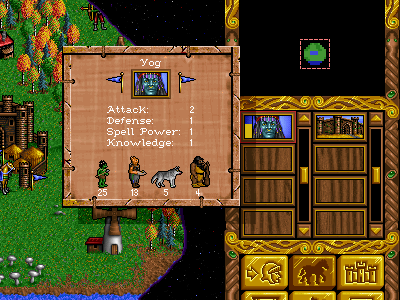
Place the cursor over his picture and R- click and hold the
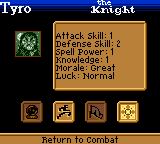
button down. A window will come up displaying his name,
statistics, and the type and number of troops that are accompanying
him. Release the mouse button and the display disappears (you can
R-click on many things in the game to get this kind of quick informa-
tion). The blank boxes below Yog (your hero) and your
castle are for future heroes and castles.
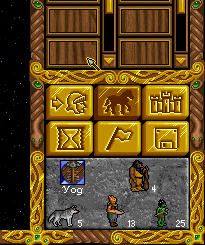
Beneath the hero and castle selectors are six buttons
that will aid in playing the game. We’ll discuss these as
we go through the tutorial.
The bottom display is the Status Window.
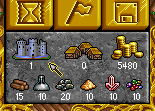
It currently shows the active hero and his army. Place the
cursor over this window and click. It now shows the amount
of resources, towns, and castles you control. It will auto-
matically return to the army display after a few seconds.
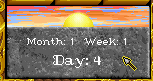

Click on it again a couple of times. It will now show you
the month, week, and day. (The Gameboy version has it
displayed at the bottom of the screen.) New recruits become
available each week, so it’s wise to keep track of the time.
This tutorial begins a few days into the week so that several
buildings could be added to your castle to get you into
the thick of things faster.
Place the cursor over the castle next to your hero’s icon
in the castle selector and click (but not on the mono-
chromatic castle in the group of six buttons).
The castle now has the red box around it, indicating it is active.
The Status Window also changes to display your resources,
since your hero is no longer active. Click on the castle a
second time to bring up the castle display.
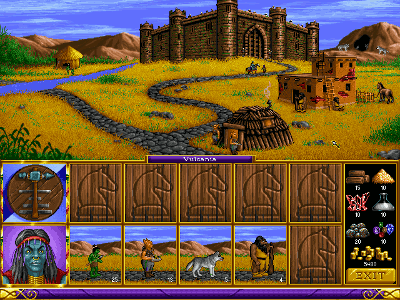
Along the top of the castle window are the dwelling places of
your potential recruits and the exterior of the castle. Place the cursor
over any of the four dwellings and R-click (holding the button
down) to see the type of troop, number available, and cost per troop.
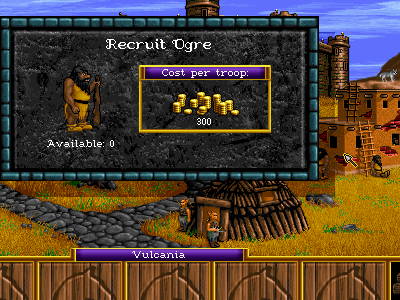
You will notice that nobody seems to be home at the
moment (we already hired them into your army).
Along the bottom of the display is your hero’s portrait,
indicating he is in the castle. His accom- panying troops are
displayed in the row of boxes to his right. You can have up to
five different troop types in any hero’s army. Note that there is one
space available in Yog’s army, indicated by the wood-grained horse’s
head. Let’s fill that up.
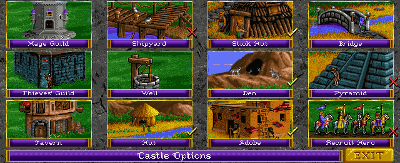
Click on the castle near the top of the screen. The upper
half of the display now shows the various dwellings that
can be purchased. You already have the Hut, Stick Hut,
Den and Adobe dwellings (marked by the yellow check).
The Shipyard and Pyramid both have prerequisites you
don’t currently have and are marked with a red X X. You
can only have one hero in a castle at a time, so Recruit
Hero is also marked with an X X. You can R-click on any of
the buildings to get more information about them. For
now, place the cursor over the Bridge and click.
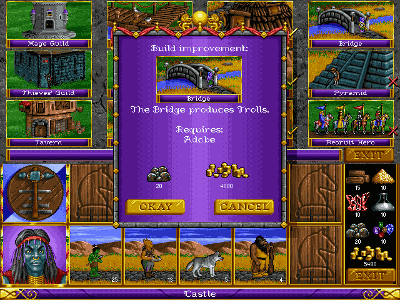
A window comes up that tells you that the Bridge pro-
duces Trolls. It also requires that the Adobe dwelling
was built in a previous turn (which we did for you already).
It will take 20 ore and 4000 gold to build. A quick glance
at the resources you have (displayed on the lower right
of the screen) reveals you have the necessities. Click on
OKAY.
The display shows the castle exterior again, and the
Bridge is added on the far left. Let’s recruit some trolls
to fill out our army.
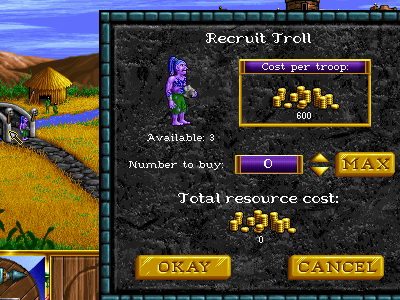
Click on the Bridge and a window entitled Recruit Troll comes up.
There are three available at 600 gold each. You are down to
1480 gold, and can only afford two. You can click on the up and
down arrows to select the number of troops you want to recruit, but
in this case, it is easier to just click on the MAX button. That will
automatically choose the maximum that you can afford, up to the limits
of how many are available. Click on MAX if you haven’t already done
so, and then click on OKAY. Two trolls have been added to your
castle garrison. The garrison occupies the five boxes above the hero’s
army. They will defend your castle if a hero and his army aren’t around,
but aren’t involved if a hero is there. To transfer the Trolls from
the garrison to your army, first click on the trolls.
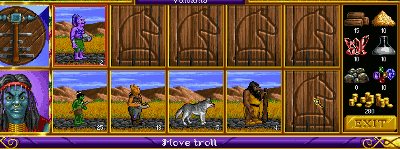
This highlights them with a red outline. Now place the cursor
over the empty space of the hero’s army at the lower
right and click. The trolls are now part of Yog’s army.
You can transfer troops from box to box by clicking on
one troop, and then clicking on the troop that you want
them to exchange places with. You may also do partial
troop transfers if the need should arise.
There are no more troops available for now, and you are
almost broke – it’s time for Yog to go adventuring. Click
on the EXIT button on the lower right.
We are back to the Adventure Window. Note that your
hero Yog has the red border around his box indicating he
is the active hero. Move the cursor around a bit in the
Adventure Map. The cursor will change depending on
what it is over.


 Move the cursor over
the treasure chest
Move the cursor over
the treasure chestthat is sparkling just below and slightly to the left of
the castle entrance. As you move the cursor it will
change to a rearing horse

 as it is placed over the chest.
The rearing horse indicates that there is an event there
that the hero can interact with. Once the horse is in the
rearing position, click. A green path of arrows is
now displayed. This indicates the path the hero will take.
He’ll avoid all events, encounters and obstacles to get to
the destination you clicked on, now marked by a green
X.
Your hero can reach any where along the path where it
is green. When the path or destination turns red, the hero won’t
reach there until subse quent turns. Once the path is set, click on
the destination a second time and the hero will move along the
path towards the destination. Do that now.
You found some gold! You can either keep the gold or distribute it
to the peasants for experience. At the start of each turn, you
accumulate 1000 gold for each castle you own, 250 for each town,
and 1000 for each gold mine. Building up your castle and army is an
expensive proposition, so the gold is needed there.
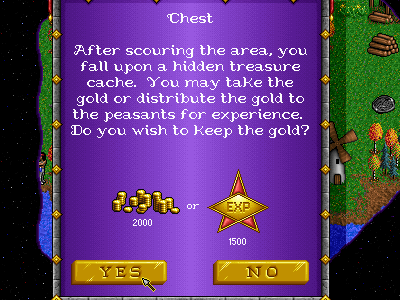
At the same time, if you take the experience, your hero’s statistics
will eventually improve, making him better in combat
or spellcasting. Decisions, decisions. For the purposes of this tutorial, click on
Yes, but learning when to choose one or the other is something your own experi-
ence and style will dictate.

Look next to your hero’s portrait and you’ll see a yellow bar indicating the
amount of movement he has left this turn. Be aware that it doesn’t start at
the very top of the bar – there are items that can improve his movement
beyond the normal. Yog still has some movement left, so let’s set a new
destination. Click on the gray obelisk above and slightly to the left of your
castle, making sure you have the rearing horse symbol.
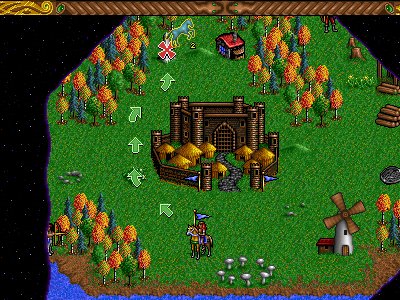
Note the numeral 2 on the right of the horse. That means it will take all
of Yog’s movement this turn, and at least part of his movement next turn to
reach there. Click to set the path. The destination is marked with a red X
this time, indicating you can’t reach there this turn. Move the cursor over
to the button with the horse icon near the right side of the screen and click.
 This
is the Move button, an alternate
command that tells
This
is the Move button, an alternate
command that tellsyour hero to move along the path once it is set.

That’s all for this turn. Click on the hourglass button.


The Status Window will show the computer players
thinking and the cursor will become a sundial.

Once the cursor changes back and the Status Window reverts to
Yog’s army, you can continue.
The red X is now green. Click on the Move button and
Yog continues along the path you set last turn. Read
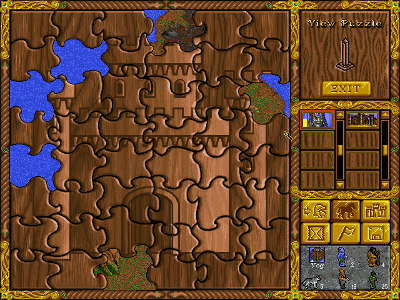
the text about the obelisk and click on OKAY. The
Adventure Map is replaced by a puzzle, with a few of the
pieces missing so that you can see part of a map beneath
it. This map reveals the location of the Ultimate Artifact.
As you find more obelisks, more and more of the map will
be revealed. If you think you are near the center of the
puzzle when you are looking at the Adventure Map, you
can dig for it.( See Adventure/Action Buttons) – for now,
we’re going to push on.
Click on EXIT in the upper right where the World Map is normally
displayed. We have returned to the Adventure Map. There is a little
house with a red roof just to the right of the obelisk. Click on that
and move there. A troop of peasants would like to join us. Click on YES.
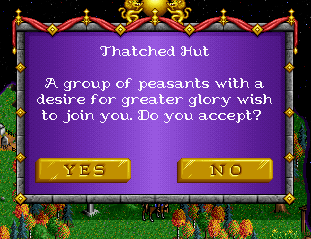
Whoops! We filled all five slots available to our army, so the peasants
can’t join us. Had there been an available slot they would have joined
us. Also, if one of our troop types was peasants, they would have been
added to the peasants we already had (troops of the same type always
occupy the same slot and cannot be split within an army). Click on
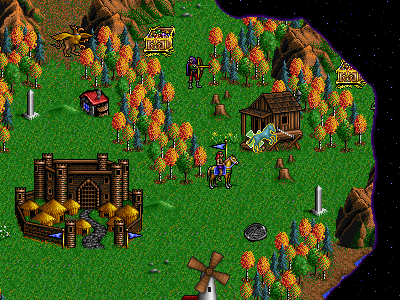
OKAY. Click on the pile of wood neatly stacked to the right of
your castle and move your hero there. A message will appear briefly in
the Status Window saying that you have found a small amount of wood.
As you moved towards the woodpile, more of the Adventure Map was
revealed to you. The hero unveils the map a set distance away as he moves
about. Just above where the woodpile used to be is a wooden struc-
ture. R-click on it and you can see that it is a sawmill.
The sawmill produces two units of wood each turn as
long as you own it. Place the cursor over the front of the
sawmill (be sure you have the rearing horse cursor icon)
and click. You shouldn’t have any movement left, so just
click on the hourglass again. Click on the Move button. Read
the text, then click on OKAY. Note that there is now a blue
flag flying over the sawmill, indicating that you own it. It will
continue to add two units of wood to your resources at the start
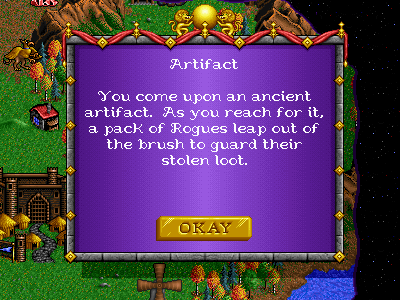
of each turn until an opponent hero captures it. Below the sawmill
there’s a gray circular item. Move to that. Text comes up telling
you that it is an artifact. Unfortunately, this particular artifact was
guarded by a pack of rogues. Click on OKAY to enter combat.
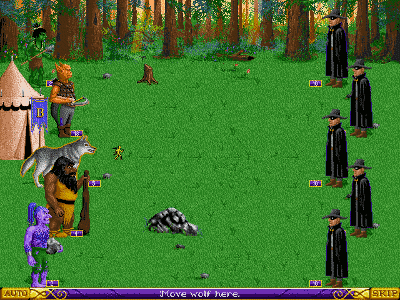
On the left side of the screen is the moving player’s
troops (the Attacker), and on the right are the encoun-
tered troops (the Defender). Thus, your troops will be
lined up on the left in any combat during your turn, and
on the right in any combat during another player’s turn.
Your troops are lined up from top to bottom in the same
order that they were lined up from left to right in your
hero’s display back at the castle.

(The Combat screen is positioned the same and units behave the
same in the Gameboy version, so lessons learned here apply.)
Combat is fought in a series of rounds, with each unit
getting to move and possibly attack once each round.
The faster the unit’s Speed, the sooner it moves in the
combat round. The computer will determine which unit gets to move
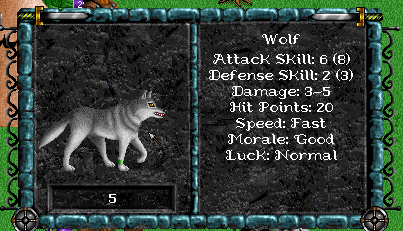
first. Your wolves are your fastest unit and will have a glowing
yellow outline when they are ready to be moved.
(For the GBC version, you highlight the unit so that
 shows up and
press B to bring up the unit into screen.)
R-click on them to see their statistics. Now move the cursor around
the field. You can move the wolves to any position on the field
where you see the yellow Running Man icon.

 All you need to
do is click on the spot you want them to move to. A red X with a
circle behind it indicates a spot they can’t move to. Some terrain may
be impassable (usually marked by a tree, pit, bush, the odd flow of
lava, etc.). Don’t move just yet.


(Press Start to bring up this screen on the Gameboy version)
On the extreme left is your hero’s tent. Place the cursor
over the tent – when the cursor changes to a yellow
helmet
 , click. A window will pop up with
Yog’s lovely vis-
, click. A window will pop up with
Yog’s lovely vis-age, his statistics, and a group of four buttons. These are
the Hero’s Combat Options. Starting on the left is the
Cast Spell button (the crystal ball). Yog doesn’t have
any spells. For now, the Cast Spell button is darkened
and can’t be selected. The next button to the right
is the Retreat button (the running knight).
Retreating loses all of your hero’s troops, but he’ll
make his way back to any of your castles with his
experience and artifacts intact and can be recruited
again. The next button is the Surrender option (the
white flag). This is similar to the Retreat option,
except you must pay a penalty to the opposing hero.
However, all your troops stay with your hero. The
more troops, the bigger the payment. To surrender,
there must be an opposing player’s hero to surrender
to, and these rogues don’t have one. Click on the last
button (four arrows) to exit the Hero’s Combat Options.
Your wolves are still waiting patiently for orders. Click
on the
 button in the lower right.
(Gameboy Users
button in the lower right.
(Gameboy Usersperform a similar action by highlighting the active unit and
pressing the A button when
shows.) All of
the rogueswill come charging forward, but won’t be able to reach
you. Time to soften them up a bit. When the goblins
come up, just click on SKIP again. Your big purple troll
should be glowing now. That big rock he is holding can be
thrown. Place the cursor over the nearest rogue. The cursor
becomes an arrow

 , indicating
you can fire at the
, indicating
you can fire at thetroop without moving. Go ahead and click. The rock is
thrown (R-click on the troll to see how many shots he
has left) and the rogue troop is greatly diminished or
wiped out. (Pressing B on a ranged unit while in combat will
do the same thing in the Gameboy Version as there is no right-
click in it.) Do the same with the orcs. Your ogre troop is
the slowest, and can’t get close enough to attack. Have
him lumber forward a bit.
All the units have moved and a new round starts. Some
of the rogues may have moved before your wolves.
That’s okay. There will probably be one within range of
your wolves’ movement in any case. Place the cursor
near the closest rogue pack. It should change to a sword

 .
.
(In the Gameboy Version, you choose the direction after
selecting the enemy unit using the sword cursor.)
The direction the sword is pointing from indicates where
the wolves will be when they attack. There are definite
tactical considerations, but for the purposes of this
demo, it doesn’t matter which direction. Choose one and
click. Your wolves will leap to the attack. Any rogues
that survive will then strike back. That is normally the
end of that particular combat , but wolves have a special
ability that allows them to attack a second time. They’ll
do this automatically if any rogues from the attacked
troop are still standing after the first attack.
With the basics of combat under your belt, this tutorial
now abandons you to your fate (don’t whimper, you
should be able to dust those rogues with Yog’s army).
Feel free to continue on with the scenario, referring to
the manual as questions arise. In two more turns, new
recruits will be available at your castle. It might be wise
to recruit a second hero, build up his army (while staying
put to guard the castle), while Yog explores the coun-
tryside. Happy adventuring!

Portions of the above are excerpts from the Heroes of Might and
Magic game manual and are copyright New World Computing.
Using the In-Game Menus.
Text like this is for the Computer version
Text like this is for the Gameboy Version
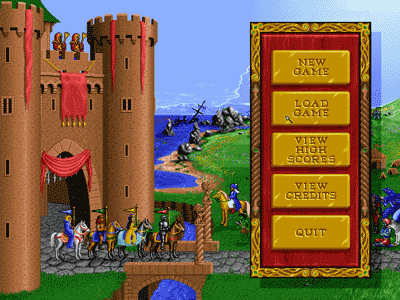
When you start the game you are given many different choices. New Game will create a new game from scratch, Load Game will allow you to load a game you have previously saved. View High Scores will show you the scores for every game completed (or the default ones if you have not yet played), view credits will bring up the game's credit screen showing the designers, programmers and artists. Quit is self explainatory, it will leave the game back to your Operating System (DOS, Windows, Mac OS).
 The text in this document is licensed under the Creative Commons Attribution-NonCommercial-ShareAlike License. Anyone is free to use, copy, modify and re-distribute this work as long as they agree to the terms in the license.